
Audio and video documentaion is often an important component of projects that analyse or evaluate musical performance and/or interaction. This is also the case in the Cross Adaptive project where every session was to be recorded in video and multi-track audio, and subsequently within two days, this material should be organized and edited into a 2-5 minute digest. However, when documenting sessions in this project we face the challenge of having several musicians located in one room (the studio recording room), often so that they are facing each other rather than being oriented in the same direction. Thus, an ordinary single camera recording of the musicians would have difficulties including all musicians in one image. Our challenge, then, has been to find some way of doing this that has high enough quality to be able to detect salient aspects of the musical performances, that is in sync both for video streams and audio, and but isn’t too expensive, since the budget for this work has been limited, or too complicated to handle. In this blog post I will present some of the options I have considered, both in terms of hardware and software, and present some of the tests I have done in the process.
Commercial hardware/software solutions
One of the things we considered in the first investigative phase was to check the commercial market for multi-camera recording solutions. After some initial searches on the web I made a few inquiries, which resulted in two quotes for two different systems:
1. A system based on the Matrox VS4 Recorder pro (
http://www.matrox.com/video/en/products/vs4/vs4recorderpro/
)
2. StreamPix 7, multi-camera version (
https://www.norpix.com/products/streampix/streampix.php
).
Both included all hardware and software needed for in-sync multi-camera recording, except for the cameras in themselves. The StreamPix quote also included a computer with suitable specs. Both quotes were immediately deemed inadequate since prices were well beyond our budget (> $5000).
I also have to mention that after having set up a system for the first session in September 2016, we have seen the Apollo multicamera recorder/switcher, which looks like a very light weight and convenient way of doing multi-camera recording:
https://www.convergent-design.com/apollo
At $2.995 (price listed on the US web site), it might be a possibility to consider in the future, even if it still is in the high end of our budget range.
Using PCs and USB3 cameras
A project currently running at the NTNU (in collaboration with NRK and UNINETT) is Nettmusikk (Net Music). This project is testing solutions to do high-resolution, low latency streaming of audio and video over the internet. The project has bought four USB3 cameras (Point Grey Grasshopper, GS3-U3-41C6C-C) and four dual boot (Linux/win) PCs with high-performance specs. These cameras deliver a very high quality image with low latency. However, one challenge is that the USB3 standard is still not very developed so that cameras can “plug-and-play” on all platforms, and specifically that the software and drivers for the Point Grey cameras is proprietary, and won’t therefore provide images for all software out-of-the-box.
After doing some research on the Point Grey camera solution, we found that there were several issues that made this option unsuitable and/or impractical.
1. To get full sync between cameras, they needed to have an optical strobe sync, which required a master/slave configuration with all cameras to in the same room.
2. There was no software that could do multi-camera recording from USB3 out-of-the-box. Rather, Point Grey provided an SDK (Fly Capture) with working examples that allowed building of our own applications. While this was an option we considered, it still looked like an option that demanded a bit of programming work (C++).
3. Because the cameras stream and record in raw we would also need very fast SSDs to record 4 video files at once. If we were recording 4 video streams at 8-bit 1920×1080 @ 30 FPS that would be 248.8 mb/s (62.2 x 4) of data. This would also fill up hard drive space pretty fast.
USB2 HD cameras
It turned out that one of the collaborators in the Nettmusikk project had access to four USB2 HD cameras. Since the USB2 protocol is a cross-platform standard that provides plug-and-play and usually has few issues with compatibility. The quality of these Tanberg Precision HD cameras was far from professional production quality, but had reasonably clear images. When viewing the camera image on a computer, there was a barely noticable latency. Here is a review made by the gadgeteer:
http://the-gadgeteer.com/2010/03/26/tandberg-precisionhd-usb-video-camera-review/
Without high-quality lenses, however, the possibilities for adjusting zoom, angle and light sensiticity were non-existent, and particularly the latter proved to be an issue in the sessions. Especially we went into problems if direct light sources were in the image, so that careful placement of light sources was necessary. Also, it was sometimes difficult to get enough distance between the cameras and the performer since the room wasn’t very big, and an adjustable lens would probably have been of help here. Furthermore, the cameras has an autofocus function that sometimes was confused in the first session, making the image blurry for a second or two, until it was appropriately adjusted. Lastly, the cameras had a foot suitable for table placement, but no possibilities of fastening it to a standard stand, like the Point Grey camera has. I therefore had to use duck tape to fasten the cameras, which worked ok, but looked far from professional.
A second issue for concern was whether these cameras could provide images with long cable lengths. What I learned here was that they would operate perfectly with an 5m USB extension if they were connected to a powered hub at the end, that provided the cameras with sufficient power. It turned out that two cameras per hub did work, but might sometimes introduce some latency and drop-outs. Thus, taking the signal from four cameras via four hubs and extension chords into the four USB ports on the PC seemed like the best solution. (Although we only used three hubs in the first session). That gave us a fairly high flexibility in terms of placing the cameras.
Mosaic image
Due to the very high amounts of data involved in dealing with multiple cameras, using instead a composite/ mosaic gathering all four images into one, seemed like a possible solution. Arguably, it would going from HD to HD/4 per image. Still, this option had the great advantage of making post-production switching between cameras superfluous. And since the goal in this project was to produce a 2-5 minute digest in two days this seemed like a very attracive option. The question was then how to collate and sync four images into one without any glitches or hiccups. In the following, I will present the four solutions that was tested:
1. ffmpeg (
https://www.ffmpeg.org/
)
ffmpeg is an open source command line software that can do a number of different operation on audio and video streams and files; recording, converting, filtering, ressampling, muxing, demuxing, etc. It is highly flexible and customizable with the cost of having a steep user threshold with cumbersome operation, since everything has to be run at command line. The flexibility and the fact that it was free still made it an option to consider.
ffmpeg could be easily installed OSX from pre built binaries. On Windows it also has to be built from sources with the mingw-w64 project (see https://trac.ffmpeg.org/wiki/CompilationGuide/MinGW ). This option seemed like a bit of work, but at the time when it was considered, it still sounded like a viable option.
After some initial tests based on examples in the ffmpeg wiki ( https://trac.ffmpeg.org/wiki ) I was able to run the following script as a test on OSX:
ffmpeg -f avfoundation -framerate 30 -pix_fmt:0 uyvy422 -i “0” -f avfoundation -framerate 30 -pix_fmt:0 uyvy422 -i “1” -f avfoundation -framerate 30 -pix_fmt:0 uyvy422 -i “0” -f avfoundation -framerate 30 -pix_fmt:0 uyvy422 -i “0” -filter_complex “nullsrc=size=640×480 [base]; [0:v] setpts=PTS-STARTPTS, scale=320×240 [upperleft]; [1:v] setpts=PTS-STARTPTS, scale=320×240 [upperright]; [2:v] setpts=PTS-STARTPTS, scale=320×240 [lowerleft]; [3:v] setpts=PTS-STARTPTS, scale=320×240 [lowerright]; [base][upperleft] overlay=shortest=1 [tmp1]; [tmp1][upperright] overlay=shortest=1:x=320 [tmp2]; [tmp2][lowerleft] overlay=shortest=1:y=240 [tmp3]; [tmp3][lowerright] overlay=shortest=1:x=320:y=240” -t 5 -target film-dvd -y ~/Desktop/output.mpg
The script produced four streams of video, one from the an external web camera and three from the internal Face Time HD camera. However, the individual images were far from in sync, and seemed to loose the stream and/or lag behind several seconds at a time. This initial test plus the sync issues and the prospects of a time consuming build process on Windows made me abandon the ffmpeg solution.
2. Processing
Using Processing, described as a “flexible software sketchbook and a language for learning how to code within the context of the visual arts” (
https://processing.org/
), seemed like a more promising path. Again I relied on examples I located on the web and put together a sketch that seemed to do what we were after (I also had to install the video library to be able to run the sketch).
import processing.video.*;
Capture camA;
Capture camB;
Capture camC;
String[] cameras;
void setup(){
size(1280, 720);
cameras=Capture.list();
println(“Available cameras:”);
for (int i = 0; i < cameras.length; i++) {
println(cameras[i], i);
}
/// Choose cameras with the appropriate number from the list and corresponding resolution
/// Here I had to look in the printout list to find the correct numbers to enter
camA = new Capture(this,640,360,cameras[18]);
camB = new Capture(this,640,360,cameras[3]);
camC = new Capture(this,640,360,cameras[33]);
camA.start();
camB.start();
camC.start();
}
void draw() {
image(camA, 0, 0, 640,360);
image(camB, 640, 0, 640,360);
image(camC, 0, 360, 640,360);
}
void captureEvent(Capture c) {
if(c==camA){
camA.read();
}else if(c==camB) {
camB.read();
}else if(c==camC) {
camC.read();
}
}
This sketch nicely gathered the images from three cameras into my mac, with little latency (approx. 50-100 ms). This made me opt to go further and port the sketch to Windows. After installing Processing on the win-PC and running the sktetch there however, I could only get one image out at a time. My hypothesis was that the problem came from all the different cameras having the same number in the list of drivers. These problem made me abandon Processing in search for simpler solutions.
3. IP Camera Viewer
After doing some more searches, I came across IP Camera viewer (
http://www.deskshare.com/ip-camera-viewer.aspx
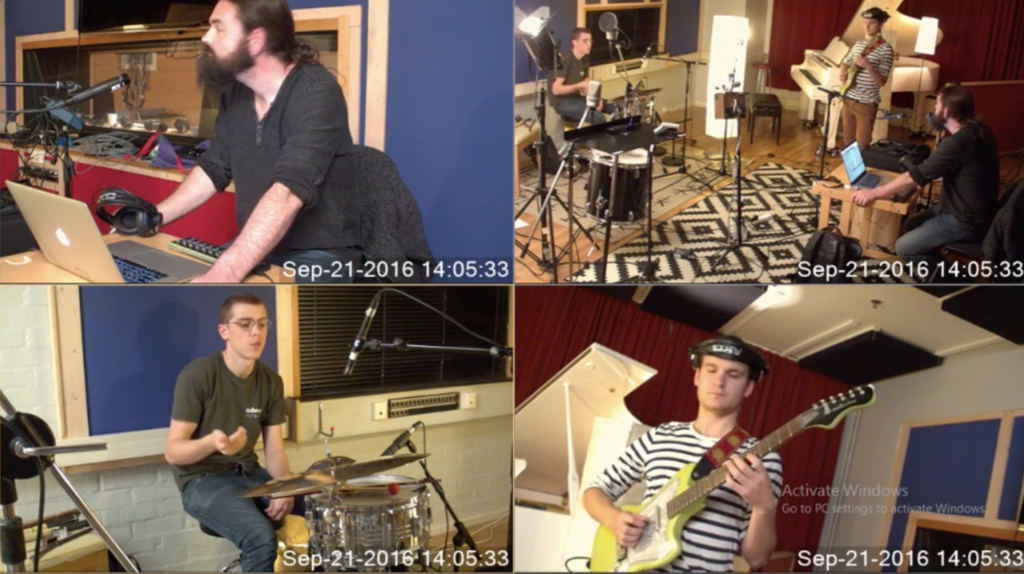
), a free and light-weight application for different win versions, with support for over 2000 cameras according to their web site. After some initial tests, I found that this application was a quick and easy solution to what we wanted in the project. I could easily gather up to four camera streams in the viewer and the quality seemed good enough to capture details of the performers. It was also very easy to set up and use, and also seemed stable and robust. Thus, this solution turned out to be what we used in our first session, and it gave us results that were good enough in quality for performance analysis.
4. VLC (
http://www.videolan.org/vlc/
)
The leader of the Nettmusikk project, Otto Wittner, made a VLC script to produce a mosaic image, albeit with only two images:
# Webcam no 1
new ch1 broadcast enabled
setup ch1 input v4l2:///dev/video0:chroma=MJPG:width=320:height=240:fps=30
setup ch1 output #mosaic-bridge{id=1}
# Webcam no 2
new ch2 broadcast enabled
setup ch2 input v4l2:///dev/video1:chroma=MJPG:width=320:height=240:fps=30
setup ch2 output #mosaic-bridge{id=2}
# Background surface (image)
new bg broadcast enabled
setup bg input bg.png
# Add mosaic on top of image, encode everything, display the result as well as stream udp
setup bg output #transcode{sfilter=mosaic{width=640,height=480,cols=2,rows=1,position=1,order=”1,2″,keep-picture=enabled,align=1},vcodec=mp4v,vb=5000,fps=30}:duplicate{dst=display,dst=udp{dst=streamer.uninett.no:9400}}
setup bg option image-duration=-1 # Make background image be streamed forever
#Start everything
control bg play
control ch1 play
control ch2 play
While it seemed to work well on Linux with two images, the fact that we already had a solution in place made it natural not to persue this solution further at the time.
5. Other software
Among other software I located that could gather several images into one was CaptureSync (
http://bensoftware.com/capturesync/
). This software was for mac only, and was therefore not tested.
Screen capture and broadcast
Another important function that still wasn’t covered with the IP camera viewer was recording. Another search uncovered many options here, most of them directed towards gaming capture. The first of these I tested was OBS, Open Broadcaster Software (
https://obsproject.com/
). This open source software turned out to do exactly what we wanted and more, so this became the solution we used at the first session. The software was easily setup to record from the desktop with a 30fps frame rate and close to HD quality with output set to .mp4. There was, however, a noticable lag between audio and video, with video lagging behind approximately 50-100ms. This was corrected in post-production editing, but could potentially have been solved with inserting a delay on the audio stream until it was in sync. Also there were occasional clicks in the audio stream, but I did not have time to figure out whether this was caused by the software or the (internal) sound device we used for recording. We will do more tests on this matter later. The recordings were started with a clap to allow for post-sync.
Surprisingly, OBS was very easy to set it up for live-streaming. I used my own YouTube account where I set up for the Stream Now option ( https://support.google.com/youtube/answer/2853700?hl=en ). This gave me a a key code that I could copy into OBS, and then simply press the “Start streaming” button. The stream had a lag of about 10 seconds, but had a good quality and consistence. Thereby we had easily set up something we only considered as optional to begin with. Øyvind was very pleased to be able to follow the last part of the first session from his breakfast table in San Diego!
Custom video markup solution
Øyvind wrote a small command line program in python that could generate a time-code based list of markers to go with the video. When pressing a number one could indicate when (number of seconds before pressing) a comment was to be inserted relative to a custom set timer. This made it possible to easily synchronize with the clock that IP Camera Viewer printed on top of the video images. Moreover, it allowed rating significance. Although it required a little bit of practice, I found it useful for making notes during the session, as well as when going through the post-session interview videos. One possible way of improving it would be to have a program that could merge and order (in time) comments made either in different run throughs or by different commentators.
Editing
After two days of recording the videos were to be edited down to a single five minute video. After some testing with free software like iMovie (mac) and MovieMaker (win), I abandoned both options due to lack of options and intuitive use. After a little bit of serching I discovered Filmora from Wondershare (
http://filmora.wondershare.com/
), which I tried out as a free demo before I decided to buy it ($29.90 for a 1-year license). In my view, it was lightweight, had sufficient options to do simple editing and it was quick and easy to use.
Conclusions
We ended up with a multicamera recording and live-streaming solution that was easy to use and very cheap to set up. The only expenses we have had so far has been USB extension cords and hubs as well as the Filmora editor, which was also cheap. Although we do not have our own cameras yet, the prices of new USB2 cameras would not imply a big cut into the budget, if we need to buy four of them. Moreover, finding free software that gave us what we wanted out-of-the-box was a huge relief after intital tests with software like ffmpeg, Processing and VLC.