The entrails of Open Sound Control, part one

Many of us are very used to employing the Open Sound Control (OSC) protocol to communicate with synthesisers and other music software. It’s very handy and flexible for a number of applications. In the cross adaptive project, OSC provides the backbone of communications between the various bits of programs and plugins we have been devising.

Generally speaking, we do not need to pay much attention to the implementation details of OSC, even as developers. User-level tasks only require us to decide the names of messages addresses, its types and the source of data we want to send. At Programming level,  it’s not very different: we just employ an OSC implementation from a library (e.g. liblo, PyOSC) to send and receive messages.

It is only when these libraries are not doing the job as well as we’d like that we have to get our hands dirty. That’s what happened in the past weeks at the project. Oeyvind has diagnosed some significant delays and higher than usual cost in OSC message dispatch. This, when we looked, seemed to stem from the underlying implementation we have been using in Csound (liblo, in this case). We tried to get around this by implementing an asynchronous operation, which seemed to improve the latencies but did nothing to help with computational load. So we had to change tack.

OSC messages are transport-agnostic, but in most cases use the User Datagram Protocol transport layer to package and send messages from one machine (or program) to another. So, it appeared to me that we could just simply write our own sender implementation using UDP directly. I got down to programming an OSCsend opcode that would be a drop-in replacement for the original liblo-based one.

OSC messages are quite straightforward in their structure, based on 4- byte blocks of data. They start with an address, which is a null-terminated string like, for instance, “/ foo / bar ”  :

'/' 'f' 'o' 'o' '/' 'b' 'a' 'r' '\0'

This, we can count, has 9 characters – 9 bytes – and, because of the 4-byte structure, needs to be padded to the next multiple of 4, 12, by inserting some more null characters (zeros). If we don’t do that, an OSC receiver would probably barf at it.

Next, we have the data types, e.g. ‘i’, ‘f’, ‘s’ or ‘b’ (the basic types). The first two are numeric, 4-byte integers and floats, respectively. These are to be encoded as big-endian numbers, so we will need to byteswap in little-endian platforms before the data is written to the message. The data types are encoded as a string with a starting comma (‘,’) character, and need to conform to 4-byte blocks again. For instance, a message containing a single float would have the following type string:

',' 'f' '\0'

or “,f”. This will need another null character to make it a 4-byte block. Following this, the message takes in a big-endian 4-byte floating-point number.  Similar ideas apply to the other numeric type carrying integers.

String types (‘s’) denote a null-terminated string, which as before, needs to conform to a length that is a multiple of 4-bytes. The final type, a blob (‘b’), carries a nondescript sequence of bytes that needs to be decoded at the receiving end into something meaningful. It can be used to hold data arrays of variable lengths, for instance. The structure of the message for this type requires a length (number of bytes in the blob) followed by the byte sequence. The total size needs to be a multiple of 4 bytes, as before. In Csound, blobs are used to carry arrays, audio signals and function table data.

If we follow this recipe, it is pretty straightforward to assemble a message, which will be sent as a UDP packet. Our example above would look like this:

'/' 'f' 'o' 'o' '/' 'b' 'a' 'r' '\0' '\0' '\0' '\0'
',' 'f' '\0' '\0' 0x00000001

This is what OSCsend does, as well as its new implementation. With it, we managed to provide a lightweight (low computation cost) and fast OSC message sender. In the followup to this post, we will look at the other end, how to receive arbitrary OSC messages from UDP.

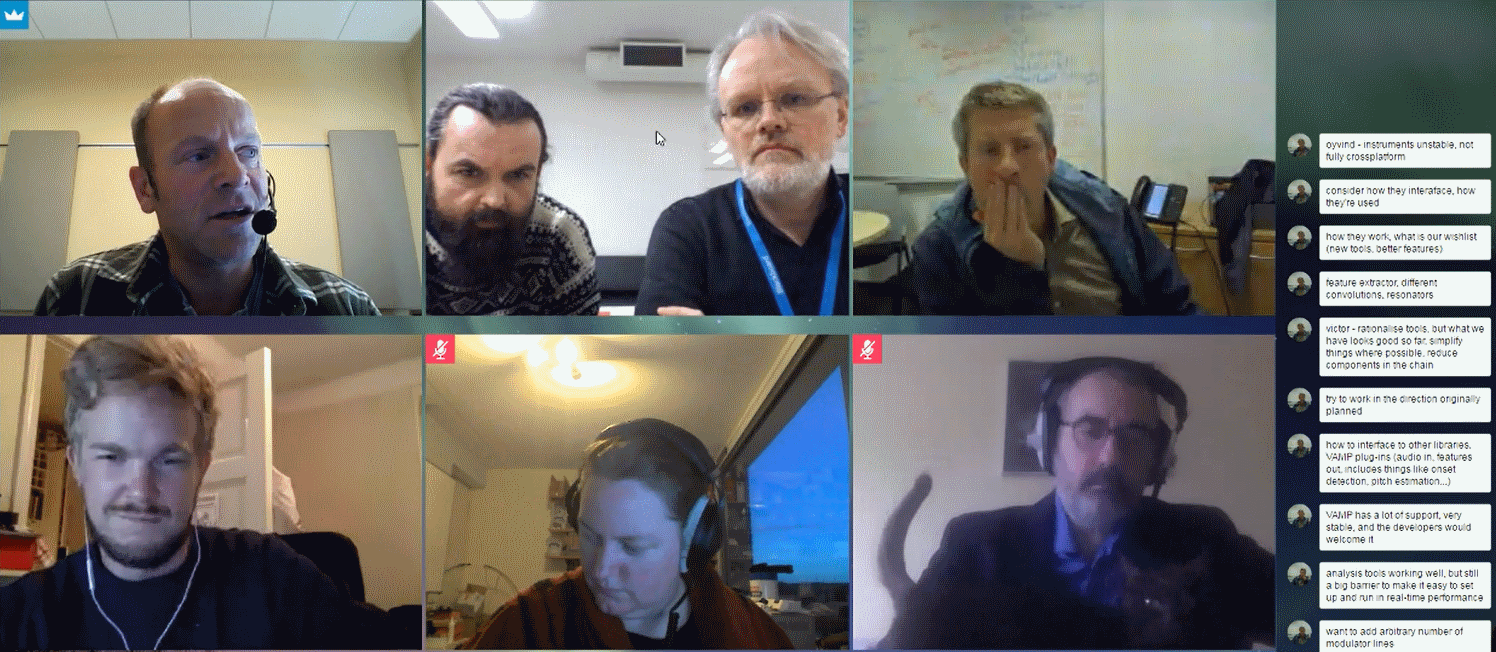
Seminar on instrument design, software, control

Online seminar March 21

Trond Engum and Sigurd Saue (Trondheim)
Bernt Isak Wærstad (Oslo)
Marije Baalman (Amsterdam)
Joshua Reiss (London)
Victor Lazzarini (Maynooth)
Øyvind Brandtsegg (San Diego)
Instrument design, software, control

We now have some tools that allow practical experimentation, and we’ve had the chance to use them in some sessions. We have some experience as to what they solve and don’t solve, how simple (or not) they are to use. We know that they are not completely stable on all platforms, there are some “snags” on initialization and/or termination that give different problems for different platforms. Still, in general, we have just enough to evaluate the design in terms of instrument building, software architechture, interfacing and control.

We have identified two distinct modes of working crossadaptively: The Analyzer-Modulator workflow, and a Direct-Cross-Synthesis workflow. The Analyzer-Modulator method is comprised of extracting features, and arbitrarily mapping these features as modulators to any effect parameter. The Direct-Cross-Synthesis method is comprised by a much closer interaction directly on the two audio signals, for example as seen with the liveconvolver and or different forms of adaptive resonators. These two methods give very different ways of approaching the crossadaptive interplay, with the direct-cross-synthesis method being perceived as closer to the signal , and as such, in many ways closer to each other for the two performers. The Analyzer-Modulator approach allows arbitrary mappings, and this is both a strngth and a weakness. It is powerful by allowing any mapping, but it is harder to find mappings that are musically and performatively engaging. At least this can be true when a mapping is used without modification over a longer time span. As a further extension, an even more distanced manner of crossadaptive interplay was recently suggested by Lukas Ligeti (UC Irvine, following Brandtsegg’s presentation of our project there in January). Ligeti would like to investigate crossadaptive modulation on MIDI signals between performers. The mapping and processing options for event-based signals like MIDI would have even more degrees of freedom than what we achieve with the Analyzer-Modulator approach, and it would have an even greater degree of “remoteness” or “disconnectedness”. For Ligeti, one of the interesting things is the diconnectedness and how it affects our playing. In perspective, we start to see some different viewing angles on how crossadaptivity can be implemented and how it can influence communication and performance.

In this meeting we also discussed problems of the current tools, mostly concerned with the tools of the Analyzer-Moduator method, as that is where we have experienced the most obvious technical hindrance for effecttive exploration. One particular problem is the use of MIDI controller data as our output. Even though it gives great freedom in modulator destinations , it is not straightforward for a system operator to keep track of which controller numbers are actively used and what destinations they correspond to. Initial investigations of using OSC in the final interfacing to the DAW have been done by Brandtsegg, and the current status of many DAWs seems to allow “auto-learning” of OSC addresses based on touching controls of the modulator destination within the DAW. a two-way communication between the DAW and ouurr mapping module should be within reach and would immensely simplify that part of our tools.
We also discussed the selection of features extracted by the Analyzer, whic ones are more actively used, if any could be removed and/or if any could be refined.

Initial comments

Each of the participants was invited to give their initial comments on these issues. Victor suggests we could rationalize the tools a bit, simplify, and get rid of the Python dependency (which has caused some stability and compatibility issues). This should be done without loosing flexibility and usability. Perhaps a turn towards the originally planned direction of reying basically on Csound for analysis instead of external libraries. Bernt has had some meetings with Trond recently and they have some common views. For them it is imperative to be able to use Ableton Live for the audio processing, as the creative work during sessions is really only possible using tools they are familiar with. Finding solutions to aesthetic problems that may arise require quick turnarounds, and for this to be viable, familiar processing tools.  There have been some issues related to stability in Live, which have sometimes significantly slowed down or straight out hindered an effective workflow. Trond appreciates the graphical display of signals, as it helps it teaching performers how the analysis responds to different playing techniques.

Modularity

Bernt also mentions the use of very simple scaled-down experiments directly in Max, done quickly with students. It would be relatively easy to make simple patches that combines analysis of one (or a few) features with a small number of modulator parameters. Josh and Marije also mentions modularity and scaling down as measures to clean up the tools. Sigurd has some other perspectives on this, as it also relates to what kind of flexibility we might want and need, how much free experimentation with features, mappings and desintations is needed, and also to consider if we are making the tools for an end user or for the research personell within the project. Oeyvind also mentions some arguments that directly opposes a modular structure, both in terms of the number of separate plugins and separate windows needed, and also in terms of analyzing one signal with relation to activity in another (f.ex. for cross-bleed reduction and/or masking features etc).

Stability

Josh asks about the stability issues reported. any special feature extractors, or other elements that have been identified that triggers instabilities. Oeyvind/Victor discuss a bit about the Python interface, as this is one issue that frequently come up in relation to compatibility and stability. There are things to try, but perhaps the most promising route is to try to get rid of the Python interface. Josh also asks about the preferred DAW used in the project, as this obviously influence stability. Oeyvind has good experience with Reaper, and this coincides with Josh’s experience at QMUL. In terms of stability and flexibility of routing (multichannel), Reaper is the best choice. Crossadaptive work directly in Ableton Live can be done, but always involve a hack. Other alternatives (Plogue Bidule, Bitwig…) are also discussed briefly. Victor suggests selecting a reference set of tools, which we document well in terms of how to use them in our project. Reaper has not been stable for Bernt and Trond, but this might be related to  setting of specific options (running plugins in separate/dedicated processes, and other performance options). In any case, the two DAWs of immediate practical interest is Reaper (in general) and Live (for some performers). An alternative to using a DAW to host the Analyzer might also be to create a standalone application, as a “server”, sending control signals to any host. There are good reasons for keeping it within the DAW, both as session management (saving setups)  and also for preprocessing of input signals (filtering, dynamics, routing).

Simplify

Some of the stability issues can be remedied by simplifying the analyzer, getting rid of unused features, and also getting rid of the Python interface. Simplification will also enable use for less trained users, as it enable self-education and ability to just start using it and experiment. Modularity might also enhance such self-education, but a take on “modularity” might simply hiding irrelevant aspects of the GUI.
In terms of feature selection the filtering of GUI display (showing only a subset) is valuable. We see also that the number of actively used parameters is generally relatively low, our “polyphonic attention” for following independent modulations generally is limited to 3-4 dimensions.
It seems clear that we have some overshoot in terms of flexibility and number of parameters in the current version of our tools.

Performative

Marije also suggests we should investigate further what happens on repeated use . When the same musicians use the same setup several times over a period of time, working more intensively, just play, see what combinations wear out and what stays interesting. This might guide us in general selection of valuable features. Within a short time span (of one performence), we also touched briefly on the issue of using static mappings as opposed to changing the mapping on the fly. Giving the system operator a more expressive role, might also solve situations where a particular mapping wears our or becomes inhibiting over time. So far we have created very repeatable situations, to investigate in detail how each component works. Using a mapping that varies over time can enable more interesting musical forms, but will also in general make the situation more complex. Remembering how performers in general can respond positively to a certain “richness” of the interface (tolerating and even being inspired by noisy analysis), perhaps varying the mapping over time also can shift the attention more on to the sounding result and playing by ear holistically, than intellectually dissecting how each component contributes.
Concluding remarks also suggests that we still need to play more with it , to become more proficient, having more control, explore and getting used to (and getting tired of) how it works.

Audio effect: Liveconvolver3

The convolution audio effect is traditionally used to sample a room to create artificial reverb. Others have used it extensively for creative purposes, for example convolving guitars with angle grinders and trains. The technology normally requires recording a sound, then analyzing it and then finally loading the analyzed impulse response (IR) into an effect to use it. The Liveconvolver3 let you live sample the impulse response and start convolving even before the recording is finished.

In the context of the crossadaptive project, convolution can be a nice way of imprinting the characteristics of one audio source on another. The live sampling of the IR is necessary to facilitate using it in an improvised manner, reacting immediately to what is played here and now.

There are some aesthetic challenges , namely how to avoid everything turning into a (somewhat beautiful) mush. This is because in convolution all samples of one sound is multiplied with every sample of the other sound. If we sample a long melodic line as the IR, a mere click of the toungue on the other audio channel will fire the whole melodic segment once. Several clicks will create separate echoes of the melody, and a coninuous sound will create literally thousands of echoes. What is nice is that only frequencies that the two signals have in common will come out of the process. So a light whisper will create a high frequency whispering melody (with the long IR described above), while a deep and resonant drone will just let those (spectral) parts of the IR through. Since the IR contains a recording not only of spectral content but also of its evolution over  time, it can lend spectrotemporal morphing features from one sound to another. To reduce the mushyness of the processed sound, we can enhance the transients and reduce the sustained parts of the input sound. Even though this kind of (exaggerated) transient designer processing might sound artificial on its own, it can work well in the context of convolutions. The current implementation, Liveconvolver3, does not include this kind of transient processing, but we have done this earlier so it will be easy to add.

There are also some technical challenges to using this technique in a live setting. These are related to amplitude control, and to the risk of feedback when playing on larger speaker systems. The feedback risk occurs because we are taking a spectral snapshop (the impulse response) of the room we are currently playing in (well, of an instrument in that room, but nevertheless, the room is there), then we process sound coming from (another source in) the same room. The output of the process will enhance those frequencies that the two sources have in common, hence the characteristics of the room (and the speaker system) will be amplified, and this generally creates the risk of feedback to arise. Once we have unwanted feedback with convolution, it will also generally take a while (a few seconds) to get rid of, since the nature of the process creates a revereb-like tail to every sound. To reduce the risk of feedback we use a very small frequency shift of the convolver output. This is not usually perceptible, but it disturbs the feedback chain sufficiently to significantly reduce the feedback potential.

The challenge of the overall amplitude control can be tackled by using the sum of all amplitudes in the IR as a normalization factor. This works reasonably well, and is how we do it in the liveconvolver. One obvious exeption being in the case where the IR and the input sound contains overlapping strong resonances (or single lone notes). Then we will get a lot of energy on those overlapping frequency regions, and very little else. We will work on algorithms to attempt normalization in these cases as well.

The effect

liveconvolver3_reaper_setup
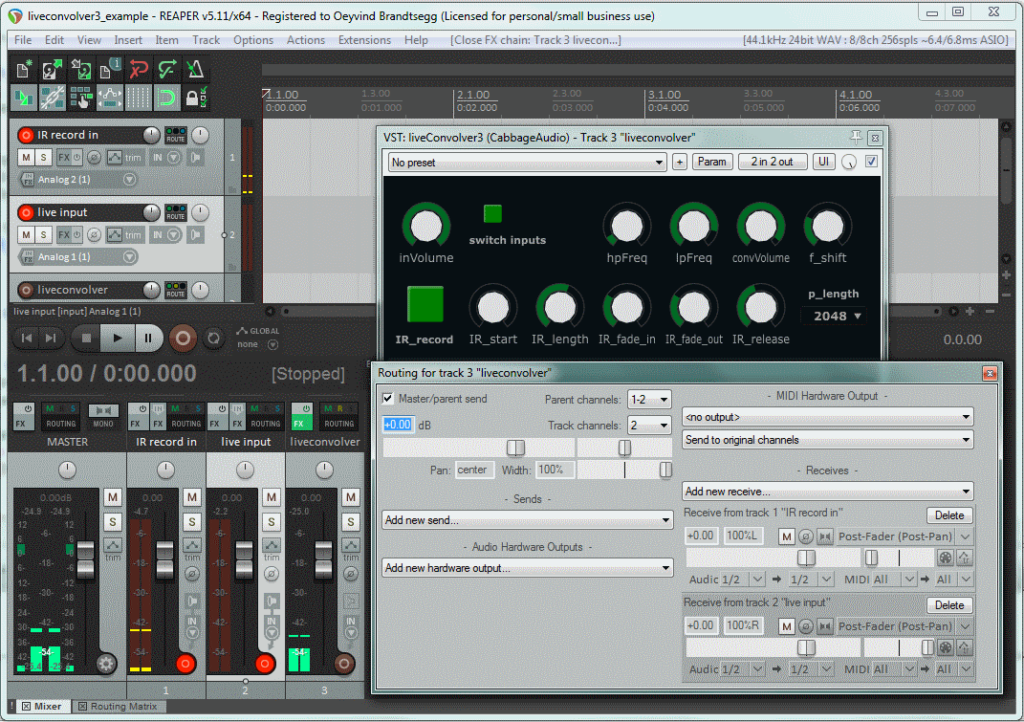
Liveconvolver3 in an example setup in Reaper. Note the routing of the source signals to the two inputs of the effect (aux sends with pan).

The effect uses two separate audio inputs, one for the impulse response sampling, and one for the live input to be convolved.  We have made it as a stereo effect, but do not expect it to convolve a stereo input. It also creates a mono output in the current implementation (the same signal on both stereo outputs). In the figure we see two input sources. Track 1 receives external audio, and routes it to an aux send to the liveconvolver track, panned left so that it will enter only input 1 to the effect.. Track 2 receives external audio and similarly routes it to an aux send to the liveconvolver track, but panned right so the audio is only sent to input 2 of the effect.

The effect itself has contols for input level, highpass filtering ( hpFreq ), lowpass frequency ( lpFreq ) and output volume ( convVolume ). These controls basically do what the control name says. Then we have controls to set the start time ( IR_start ) of the impulse response (allow skipping a certain number of seconds into the recording), and the impulse response length ( IR_length ), determining how many seconds of the IR recording we want to use. There are also controls for fading the IR in and out. Without fading, we might experience clicks and pops in the output. The partition length sets the size of partitioned convolution, higher settings will require less CPU but will also make it respond slower. Usually just leave this at the default 2048. The big green button IR_record enables recording of an impulse response. The current max duration is 5.9 seconds at 44.1 kHz sampling rate. If the maximum duration is exceeded during recording, the recording simply stops and is treated as complete. The convolution process will keep running while recording, using parts of the newly recorded IR as they become available. The IR_release knob controls the amount of overlap between the new instances of convolution created during recording. When recording is done, we fall back to using just one instance again. Finally, the switch_inputs button let us (surprise!) switch the two inputs, so that input 1 will be the IR record and input 2 will be the convolver input. If you want to convolve a source with itself, you would first record an IR then switch the inputs so that the same source would be convolved with its own (previously recorded) IR. Finally, to reduce the potential of audio feedback, the f_shift control can be adjusted. This shifts the entire output upwards by the amount selected. Usually around 1 Hz is sufficient. Extreme settings will create artificial sounding effects and cascading delays.

Installation

The effect is written in the audio programming language Csound , and compiled into a VST plugin using a tool called Cabbage . The actual program code is just a small text file (a csd) that you can download here .

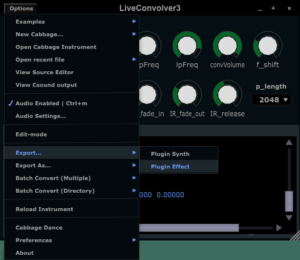
You will need to download Cabbage (the bleeding edge version can be found here ), then open the csd file in Cabbage and export it as a plugin effect. Put the exported plugin somewhere in your VST path so that your favourite DAW can find it. Then you’re all set.

cabbage_export_liveconvolver
Export as plugin effect in Cabbage

Routing in other hosts

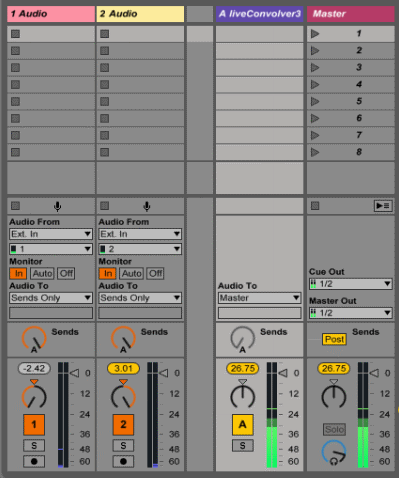
As a short update, I just came to think that some users might find it complicated to translate that Reaper routing setup to other hosts. I know a lot of people are using Ableton Live, so here’s a screenshot of how to route for the liveconvolver in Live:

liveconvolver3_live_setup
Example setup with the liveconvolver in Live

Note that

  • the aux sends are “post” (otherwise the sound would not go through the pan pot, and we need that).
  • Because the sends are post, the volume fader has to be up. We will probably not want to hear the direct unprocessed sound, so the “Audio To” selector on the channels is set to “Sends only”
  • Both input channels send to the same effect
  • The two input channel are panned hard left (ch 1) and hard right (ch 2)
  • The monitor selector for the channels is set to “in”, activating the input regardless of arm/recording

Whith all that set up, you can hit “IR_record” and record an IR (of the sound you have on channel 1). The convolver effect will be applied to the sound on channel 2.

Evolving Neural Networks for Cross-adaptive Audio Effects

I’m Iver Jordal and this is my first blog post here. I have studied music technology for approximately two years and computer science for almost five years. During the last 6 months I’ve been working on a specialization project which combines cross-adaptive audio effects and artificial intelligence methods. Øyvind Brandtsegg and Gunnar Tufte were my supervisors.

A significant part of the project has been about developing software that automatically finds interesting mappings (neural networks) from audio features to effect parameters. One thing that the software is capable of is making one sound similar to another sound by means of cross-adaptive audio effects. For example, it can process white noise so it sounds like a drum loop.

Drum loop (target sound):

White noise (input sound to be processed):

Since the software uses algorithms that are based on random processes to achieve its goal, the output varies from run to run. Here are three different output sounds:

These three sounds are basically white noise that have been processed by distortion and low-pass filter. The effect parameters were controlled dynamically in a way that made the output sound like the drum loop (target sound).

This software that I developed is open source, and can be obtained here:

https://github.com/iver56/cross-adaptive-audio

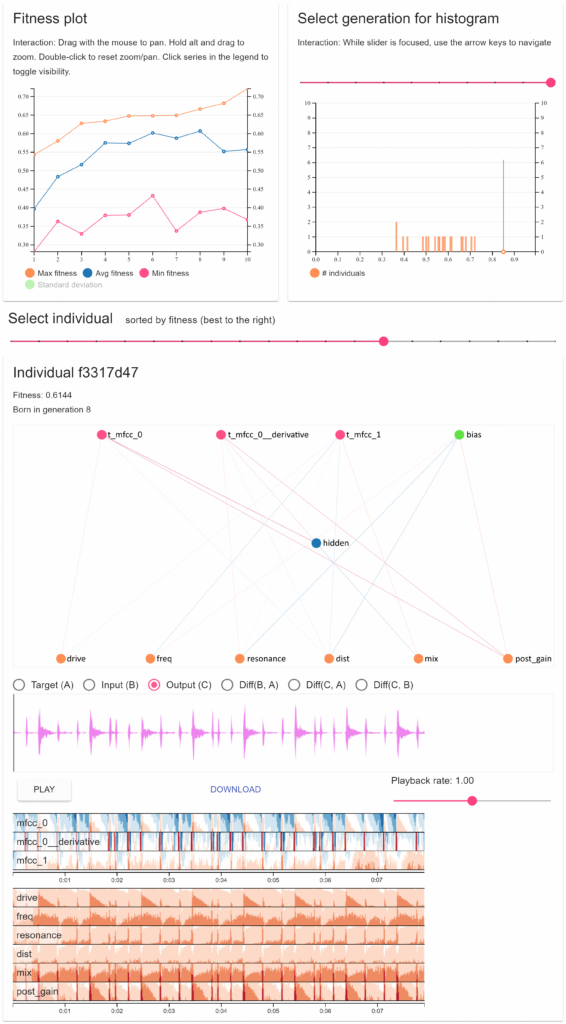
It includes an interactive tool that visualizes output data and lets you listen to the resulting sounds. It looks like this:

visualization-screenshot
For more details about the project and the inner workings of the software, check out the project report:

Evolving Artificial Neural Networks for Cross-adaptive Audio (PDF, 2.5 MB)

Abstract:

Cross-adaptive audio effects have many applications within music technology, including for automatic mixing and live music. The common methods of signal analysis capture the acoustical and mathematical features of the signal well, but struggle to capture the musical meaning. Together with the vast number of possible signal interactions, this makes manual exploration of signal mappings difficult and tedious. This project investigates Artificial Intelligence (AI) methods for finding useful signal interactions in cross-adaptive audio effects. A system for doing signal interaction experiments and evaluating their results has been implemented. Since the system produces lots of output data in various forms, a significant part of the project has been about developing an interactive visualization tool which makes it easier to evaluate results and understand what the system is doing. The overall goal of the system is to make one sound similar to another by applying audio effects. The parameters of the audio effects are controlled dynamically by the features of the other sound. The features are mapped to parameters by using evolved neural networks. NeuroEvolution of Augmenting Topologies (NEAT) is used for evolving neural networks that have the desired behavior. Several ways to measure fitness of a neural network have been developed and tested. Experiments show that a hybrid approach that combines local euclidean distance and Nondominated Sorting Genetic Algorithm II (NSGA-II) works well. In experiments with many features for neural input, Feature Selective NeuroEvolution of Augmenting Topologies (FS-NEAT) yields better results than NEAT.